Thursday, 19 September 2013

Audit Trail in Oracle Apps R12

First we need to check the application name  for  the table we want to audit


SELECT application_name FROM fnd_application_vl fav, fnd_tables ft WHERE ft.table_name = 'FND_LOOKUP_VALUES' AND ft.application_id = fav.application_id


In this example we use FND_LOOKUP_VALUES table.

Next we need to find owner of the table
 
Then make sure the audit enabled for this owner by following the screen shots


Make sure Audit Enabled checkbox is ticked

Then we need to create Audit Group


Choose Application name as per the query in first step, Audit Group is your choice,Group state should be Enable Requested. Add the FND_LOOKUP_VALUES table in Audit Tables section and save 


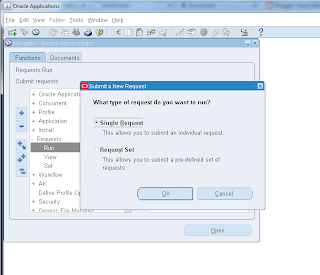
 Run the AuditTrail Update tables concurrent request

It should be completed without error.


We can check by using this query


SELECT object_name, object_type FROM all_objects WHERE object_name LIKE 'FND_LOOKUP_VALUES_A%'

Then create a lookup to check the Audit Trail tables
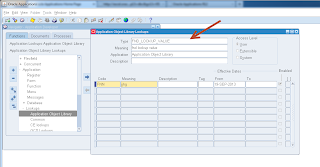
Create a lookup using application developer responsibility
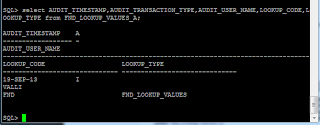
After created using this query to see the updates in Audit trail table


select AUDIT_TIMESTAMP, AUDIT_TRANSACTION_TYPE, AUDIT_USER_NAME, LOOKUP_CODE, LOOKUP_TYPE  from FND_LOOKUP_VALUES_A;

See Table FND_LOOKUP_VALUES_A  updated successfully.

 If you want to disable Audit Trail Change the group state to Disable in Audit Groups


Save it and rerun the Audit Trail Update Tables concurrent request then Audit trail will be disabled.


Oracle APPS R12 Patching Concepts

                                                            Oracle Apps Patching

Patch is a program to fix a particular problem or enhance/add a particular feature in existing program/product/software
Here is the basics steps for patching

STEP 1 :Before applying a patch you must check whether the patch is already there or not. For this we query the database:
sqlplus apps/<apps password>@<tnsalias>   then
select * from AD_BUGS where bug_number=’<patch number>’;

STEP 2 : Download the patch.
Login to oracle metalink.(www.metalink.oracle.com)
Select  the patches option then select the search type.
Query for patch by writing the patch no. & platform on which you want to download the patch.
Click download .
If you have downloaded the patch at desktop then move it to directory where you want it to unzip.
mv  <patch.zip>  <destination patch directory>
eg:  mv p4003579_linux.zip /u1/apps/patch

STEP 3 :Unzip the patch. For this
Log in as application tier user.
Go to the directory where you have your patch directory & type command-
unzip patch.zip
This will unzip the patch in current directory & will make the required patch directories & sub directories.

STEP 4 :Enable the Maintenance Mode. For This:
Set the environment file located in APPL_TOP.
Run the ad administration utility by typing adadmin on unix/linux console. It will ask questions related to admin utility with default answers in brackets.Then it shows following options & ask for the choice:
$adadmin
1.Generate applications file menu.
2.Maintain applications file menu.
3.Compile/Reload Applications Database Entities Menu.
4.Maintain Applications Database Entities Menu.
5.Change Maintenance Mode.
6.Exit ad Administration.

Select option 5. The status of maintenance mode is displayed at the top of change maintenance mode menu.Again it will show following options & ask for choice:
1.Enable Maintenance mode.
2.Disable Maintenance mode.
3.Return to Main Menu.
Select option 1. Then return to console.

Note : To check maintenance mode status
            sql > select apps.fnd_profile.value('APPS_MAINTENANCE_MODE') from dual;
This should say MAINT for enabled
For disabled it say like NORMAL

STEP 5: Run autopatch from the patch directory by entering the following command:

$ adpatch
This is adpatch without options ie default options . We will discuss the options later
After this answer the questions of autopatch. As autopatch finishes its tasks, it writes timing information to the AD timing report for jobs running in parallel (if any ) and reminds you to run the log files for any errors.
If you don’t see the “autopatch is complete” message at the end of the Autopatch log file, Autopatch did not complete successfully.

Patching Techniques
When patch is running we can check the worker status by using adctrl AD tool.
While patching some jobs failed and we need to fix it then only the patch will continue . At that time we can use adctrl for monitoring the workers
Run the ad administration utility by typing adctrl on unix/linux console. It will ask questions related to admin utility with default answers in brackets.Then it shows following options & ask for the choice:
  
AD Controller Menu
     ---------------------------------------------------

     1.    Show worker status

     2.    Tell worker to restart a failed job

     3.    Tell worker to quit

     4.    Tell manager that a worker failed its job

     5.    Tell manager that a worker acknowledges quit

     6.    Restart a worker on the current machine

     7.    Exit

Option 1 to show the worker status

Option 2 to restart the failed worker

Option 3 to quit the worker

Option 8 is not documented

Enter 8 to skip the worker and continue the patch process

Once the patch completes we need to check the patch logs for verifying the patch is successfully completed or not

Patch log location: $APPL_TOP/admin/SID/log/adpatch.log

Worker log location: $APPL_TOP/admin/SID/log/adwork001.log  --- for 1st worker
                                                $APPL_TOP/admin/SID/log/adwork002.log --- for 2nd worker .....

In patch log check for the word failed and execute the job manually for completing the patch

AD Patching options

We can check all the patching options by using

$ adpatch help=y

Now we will see the most commonly used options

preinstall – To run adpatch in Pre-Install Mode.
Default – No.
logfile – Adpatch log file name.
Default – none. Adpatch prompts for this value.
workers – Specifies the number of workers to run.
Default – none. Adpatch prompts for this value.

patchtop – Top-level directory for the current patch.
Default – none. Adpatch prompts for this value.

driver – Name of the patch driver file.
Default – none. Adpatch prompts for this value.

compiledb – To compile invalid objects in the database
after running actions in the database driver.
Default – compiledb.

compilejsp – To compile out-of-date JSP files, if the patch
has copy actions for at least one JSP file.
Default – compilejsp.

autoconfig – To run AutoConfig.
Default – autoconfig.

The options= argument is used to pass generic options to AutoPatch. It takes the form
of a comma-separated list. Enter one option or a comma-separated list of options. For
example, options=nocompiledb,nocompilejsp. Do not include a space after the

AD Merge Patch

 When you apply patches individually, you must perform patching tasks multiple times. For example, for every individual patch there may be duplicate link and generate processes. AD Merge Patch merges multiple patches into a single patch so that the required patching tasks and processes are performed only once.

i.e. admrgpch -s ./source -d ./target -merge_name merged001
For eg we are going to merge 662540 patch and 777537 patch
Assume we extracted both the patches in /u1/app/oracle/appl location
admrgpch -s /u1/app/oracle/appl/662540 -d ./ u1/app/oracle/appl/777537 -merge_name merged01
This command will create a merged driver merged01.drv file in the current folder. Then we use this driver file to apply this patches

Types of patches:
There are several different types of patches following are more common patches

One-Off Patch
This is simplest Patch to resolve a specific bug

Minipack Patch
Collection of One of Patches and enhancements related to a particular module. Alphabetic character denotes the Minipack version for the module.

Family Pack Patch
Collection of Minipack patches for a particular family group of application modules

Maintenance pack patch
This is collection of family packs that serves as point level release upgrade

Consolidated patch
Collection of one-off fixes for a family pack or maintenance pack Oracle Application 11.5.10 Consolidated Update 2 (CU2) is an example of consolidated patch.

Interoperability patch
Patch that is required for application to function with a newer version of technology stack

NLS patch
Patch that updates language specific information for multi language installation

Rollup patch
This is a collection of one off patches that update code levels for particular product

Legislative patch
Special patch for HR payroll customers it contains legislative data for multiple countries


Thursday, 22 August 2013

TKPROF generation for concurrent request and forms runtime diagnostics


TKPROF

Tkprof generation for concurrent request
First find the trace id and trace file by running this query
sql > column traceid format a8
column tracename format a80
column user_concurrent_program_name format a40
column execname format a15
column enable_trace format a12
set lines 80
set pages 22
set head off

sql > SELECT 'Request id: '||request_id ,
'Trace id: '||oracle_Process_id,
'Trace Flag: '||req.enable_trace,
'Trace Name:
'||dest.value||'/'||lower(dbnm.value)||'_ora_'||oracle_process_id||'.trc',
'Prog. Name: '||prog.user_concurrent_program_name,
'File Name: '||execname.execution_file_name|| execname.subroutine_name ,
'Status : '||decode(phase_code,'R','Running')
||'-'||decode(status_code,'R','Normal'),
'SID Serial: '||ses.sid||','|| ses.serial#,
'Module : '||ses.module
from fnd_concurrent_requests req, v$session ses, v$process proc,
v$parameter dest, v$parameter dbnm, fnd_concurrent_programs_vl prog,
fnd_executables execname
where req.request_id = &request
and req.oracle_process_id=proc.spid(+)
and proc.addr = ses.paddr(+)
and dest.name='user_dump_dest'
and dbnm.name='db_name'
and req.concurrent_program_id = prog.concurrent_program_id
and req.program_application_id = prog.application_id
and prog.application_id = execname.application_id
and prog.executable_id=execname.executable_id;

It prompts for request_id

once request id given it shows the trace file location for the requested request_id

Now from the trace file we can generate tkprof file by using the following command

Then  use this command  to get tkprof output file
$tkprof PATCH_ora_1652.trc output_file.prf explain=apps/hotspring sort=(exeela,fchela) sys=no

Tkprof generation for forms runtime diagonistics
Generate trace files for forms
Go to system administrator responsibility-> system-> profile
Profile option 'ICX: Forms Launcher'
set this profile option for user level
ie click SITE and USER checkbox
To check if forms is implemented in socket /servlet mode perform the following steps:
Open the appsweb.cfg file pointed by environment variable "FORMS_WEB_CONFIG_FILE" and check the values for following parameters:
  • serverURL=
  • connectMode=
In servlet mode
In Socket mode
serverURL=/forms/lservlet
connectMode=servlet
serverURL=(should be blank)
connectMode=Socket

profile value is according to connect mode

In Servlet Mode
In Socket Mode
https://hostname.domain:port/forms/frmservlet?record=collect
https://hostname.domain:port/OA_HTML/frmservlet?record=collect

Save this change at the USER level.

You may need to bounce Apache for profile level changes to take effect
Now trace file is generated then you can run tkprof command for generating tkprof file


Tuesday, 2 April 2013

Basics things DBA must know


Starting Oracle Single Node Instance.
su - oracle                     -- this is for switch user puprpose (oracle-Database user)
lsnrctl start orcl             -- lsnrctl means listener control starting (orcl- SID of database)
then we have to enter in sql prompt
sqlplus '/as sysdba' --sys-username sys-password sysdba previlege
startup -- to start instance
exit -- to exit sqlprompt
exit --to exit database
then we have to start application
su -applmgr  (applmgr- application user)
cd $COMMON_TOP/admin/scripts/SID_HOSTNAME/
ls --to view files inside scripts
./adstrtal.sh apps/apps  --to start application
NFS MOUNT FROM SERVER A to B
root@A ] scp -r Filename root@ipaddress B:/Location in B server 
root@A ] password for B:
(this should be run as root user from server A)
Nfs Mounting steps:-
*Source system A :-* commands are 1)vim /etc/exports -- to view already nfs mounted 2)/vin *(rw,rcync) 3)chkconfig portmap on --portmap on 4)service portmap restart --portmap restart 5)chkconfig nfs on --nfs on 6)service nfs restart --nfs restart 7)showmount -e 8)exportfs *Target System B :-* 9)mount ipaddress(A):/vin /mnt Linux Hard Disk Format Command
1.Partition the new disk using fdisk command
# fdisk -l | grep '^Disk' 

output
Disk /dev/sda: 251.0 GB, 251000193024 bytes
Disk /dev/sdb: 251.0 GB, 251000193024 bytes.

Step 1:Format the new disk using mkfs.ext3 command

# mkfs.ext3 /dev/sdb1 

step 2:To partition the disk - /dev/sdb, enter: 
# fdisk /dev/sdb 
The display shows the basic fdisk commands you need are:
  • m - print help
  • p - print the partition table
  • n - create a new partition
  • d - delete a partition
  • q - quit without saving changes
  • w - write the new partition table and exit
step 3: type n and enter
step 4:then it will ask the partition number , we have to set 1 , that is default one in starting ,
step 5:then it ask the first partition size , after we give partition sizeand pressed enter it will again show the basic fdisk commands ,
step 6:if u want to create a second partition then you have to repeat the same steps by using partition number 2 and partition size is from partition 1 end size to partition 2 size
step 7:finally we have to type w and press enter then quit otherwise the partition will not save
Source http://www.cyberciti.biz/faq/linux-disk-format/

MLS INSTALLATION IN ORACLE APPS R12


Hi all

MLS (Multi Language Support) refers to the ability to run a single instance of Oracle Applications in more than one supported language other than the American English. The following steps makes you easy to enable multiple language in Oracle E Business Suite R12

Steps for installing MLS

First we have to apply the Prerequiste patch: 8576725

Download the patch and unzip in $APPL_TOP 

Enable maintenance mode using adadmin and apply the above patch using adpatch

Download related language NLS pack from e-delivery.

Upload this zip to your EBS server.($APPL_TOP)

Unzip file and change files permission to applmgr user.

Before start NLS be sure your Db character set should support related NLS.

Open your Oracle Application Manager screen from EBS than license your
language from OAM by using

system administrator ->Oracle Applications Manager-> Licence Manager-> Languages


     Mark the language that we are going to install.

                                            For eg: Arabic 


To check whether the language is set or not

Go to the home page, enter into the preference option and just check the Default application language

Login as applmgr user, source env file then run adadmin utility

Choose :

Maintain Appl. Database Entities menu

Maintain multi-lingual tables

While is finished then close your application services, 

Enable Maintenance Mode

Go to related NLS patch directory and run adpatch utility and start patching.

Then Disable maintenance mode.

Now check whether the selected language is installed or not by going into preferences and select the installed language as current session language and apply 

Friday, 22 June 2012

Backup script

Backup Script document in linux


#! /bin/bash
# What to backup.
SOURCE="/source"

# Where to backup to.
DEST1="/backup"


# Backup the files
tar vczf $DEST1/$(date +%m-%d).tar.gz $SOURCE


echo "Backup finished"
date


#To remove 2 days before old files

# Remove old backup file
if [ -f /dest/$(date -d 'now -2 days' '+%m-%d').tar.gz ]
then
echo "exists"
rm -rf /dest/$(date -d 'now -2 days' '+%m-%d').tar.gz
fi


This script is used to take a backup of a seperate folder and stored in a location. We can add more source and target location by adding source and dest  commands. The final part of the script is to delete the backup which is older than days, you just edit the number according to your requirment. If any doubts please reply i ll solve your doubts.

Thanks
Viswa